Snickerdoodles

IMG_0241

On our way home from the farmer’s market today, we crossed paths with a lady who was taking her cute black Labrador Retriever for a walk. She was wearing a great pair of rubber rain boots covered in pictures of Labs. I complemented her on the fun footwear.

As we walked away, I thought to myself: that lady must really love dogs.

I have an affectionate, long-haired, black cat named Merlot. And I think it would be a hoot to have a pair of rubber rain boots covered in pictures of cats.

But, if I ever was to step outside the house wearing feline themed footwear, I would forever be branded a crazy cat lady. Not a lady who must really love cats. Just a crazy cat lady.

It’s an unfortunate double standard, especially since dog owners are just as crazy as us cat owners!

Don’t deny it. You talk to your pooches. Let them follow you into the bathroom. You buy them needless gadgets, beds, clothes, organic treats and Halloween costumes.

Us cat folk don’t have the market cornered on crazy. All pet owners have a little crazy in them.

I guess that’s why I’ve grown accustomed to Merlot curling up on my lap, keyboard or mouse pad whenever I sit down to blog. I’ve learned how to work around her.

Now that the baby is here, I think Merlot has realized that one of the few times I am solo is when I’m on the computer. So blogging isn’t just mommy time, it’s also a time for me to hang out with my favourite feline.

So this blog post is brought to you, in part, by my sidekick Merlot!

I’ve been meaning to try baking Snickerdoodle cookies for such a long time. And I’m glad that I finally did!

Snickerdoodles are a very simple, but delicious. The star ingredients are cinnamon and sugar. The cookies are cakey and moist, and they freeze very well.

I used a recipe from one of my favourite cookbooks, Martha Stewart’s Cookies: The Very Best Treats To Bake And To Share.

These sweet cinnamony treats were a crowd pleaser, so give them a whirl! Enjoy!

Snickerdoodles

(From Martha Stewart’s Cookies: The Very Best Treats To Bake And To Share)

2 ¾ cups all-purpose flour

2 teaspoons baking powder

½ teaspoon coarse salt

1 cup unsalted butter, room temperature

1 ½ cups plus 2 tablespoons sugar

2 large eggs

2 teaspoons ground cinnamon


– Preheat oven to 350 degrees F. Sift together flour, baking powder and salt into a bowl. Put butter and 1 ½ cups sugar in the bowl of an electric mixer fitted with the paddle attachment. Mix on medium speed until pale and fluffy, about 3 minutes. Mix in eggs. Reduce speed to low; gradually mix in flour mixture.

– Stir together cinnamon and remaining 2 tablespoons of sugar in a small bowl. Shape dough into twenty 1 ¾ inch balls; roll in cinnamon sugar. Space 3 inches apart on baking sheets lined with parchment paper.

– Bake cookies, rotating sheets halfway through, until edges are golden, 12 to 15 minutes. Let cool on sheets on wire racks.


Merlot the Cat sends her warmest regards!

Merlot the Cat sends her warmest regards!

IMG_0226

Sift it baby!

Mix the batter

Mix the batter

Shape the dough into Timbit sized balls, then roll in sweet, sweet cinnamon sugar

Shape the dough into Timbit sized balls, then roll in sweet, sweet cinnamon sugar

Line 'em up on your baking sheet

Line ’em up on your baking sheet

Fresh out of the oven!

Fresh out of the oven!

Chocolate Beet Cake with Beet Cream Cheese Frosting

IMG_0294

As of late, my five-month old daughter has not been all that interested in naptime. She’s realized the difference between being awake and asleep, and I guess she prefers the waking world. I can’t blame her, especially now that she’s mastered rolling over and hand-to-mouth co-ordination. She’s got places to go and things to chomp on.

Fewer naps have meant less time for me to bake and blog over the last few weeks. But, I think this week’s recipe – and my little girl’s developmental milestones – have been well worth the wait!

So, I present to you… chocolate cake with cream cheese icing. But this isn’t your run-of-the-mill chocolate cake and cream cheese icing. You see, this dessert has a deep, dark secret ingredient. Nestled amidst the decadent cocoa, sugar and butter are…beets. Yes beets – the kind you’d find in the produce department, piled next to the turnips and ginger root

The recipe comes from Joy the Baker. When I first saw it a couple of months ago, I knew it was something I had to try. Beets in baked good certainly seemed a bit wacky, but then again, I love carrot cake and zucchini loaf. Both of these veggie based desserts are delicious and don’t taste anything like salad.

As Joy aptly explained, the beets add a little extra sweetness and moistness to the chocolate cake. And I really loved the gorgeous pink hue they added to the icing. I’ve never been a huge fan of artificial food dyes in baking, so shredded beets offered a natural and eye-catching alternative.

If you’re worried about offending the sensibilities of those with a picky palette, you can always go with a don’t ask, don’t tell policy. Honestly, unless you tell people there are beets in the cake, no one will ever know! But I think half the fun of this recipe is the big reveal after everyone’s enjoyed their slice.

For Joy’s original recipe, I’d suggest going directly to her blog post. It’s pretty lengthy and she describes each step perfectly. I do have a couple of tips to offer.

Firstly, I’d recommend roasting, peeling and shredding the beets the night before you plan on making the cake. This whole process takes about an hour and a half. Unless you don’t mind a full blown baking marathon, I found it more manageable to do a bit of prep work in advance.

In my oven, the beets needed an extra 15 minutes. Just be sure to keep an eye on them. Roast the beets until they’re tender when poked by a fork. Joy suggests grating the beets on the finest grating plane. I found this size too small, as all the beets stuck to the grater. So I opted for the same size plane as I use for grating cheese.

And in case you’re wondering, yes the beet juice will stain your hands. In fact, after you’ve finished grating, the kitchen will likely look like a crime scene out of Dexter.

Secondly, I only used about three and a half cups of powdered sugar for the icing. Joy called for four to five cups, which is a bit sweet for my taste. But you be the judge. Start with less and add more powdered sugar according to taste.

Other than these two suggestions, follow Joy’s recipe and you won’t be disappointed! Enjoy!


First, you roast the beets

First, you roast the beets

Then, you shred the beets

Then, you shred the beets

Mix your dry ingredients, starring cocoa

Mix your dry ingredients, starring cocoa

Combine the wet mixture with the dry

Combine the wet mixture with the dry

The batter is ready to be popped in the oven

The batter is ready to be popped in the oven

Gorgeous pink beet cream cheese icing

Gorgeous pink beet cream cheese icing

Yum! No one will suspect that beets are the secret ingredient!

Yum! No one will suspect that beets are the secret ingredient!


Maple Crème Brûlée

IMG_0225

Life is full of tough decisions. But none was harder for me than selecting a baby stroller.

Seriously. Every other major choice – where to go to university, what career path to follow, where to settle down, when to start a family – seemed like a total cake walk in comparison.

It doesn’t make sense that picking a stroller is ten times more difficult than buying a car.  But it’s true.

True to my nature, I researched and researched some more. I consulted mommy blogs, Consumer Reports and surveyed every mom I knew.

I remember being about 8 months pregnant, standing in the middle of the stroller aisle of a crowded baby store. I was sweating, my back hurt, and my over-sized sweater was tangled in a half-folded stroller.

I was having one heck of a time trying to open and close one of the “easy to use” popular brands. I kept telling my husband: this one is pretty easy, I’ll get the hang of it.

It was then that my hubby gave me the best piece of advice. He told me to forget about price, style and brand. He said to imagine myself carrying ten grocery bags and crying baby in the middle of a parking lot, in the rain. If I couldn’t figure out how to work the demo stroller in the store, there’s no way I’d fare any better alone in that rainy parking lot.

I have to hand it to him. He was absolutely right. With that advice in mind, I was able to select a wonderful stroller that I’ve been putting to good use.

It’s nice to have a husband that can help you navigate through life’s hurdles, even the ones on four wheels. As a small way of saying thanks for being such a great partner and dad, I wanted to make him something especially delicious for our recent anniversary.

Inspired by a recent trip to a maple syrup festival, I decided to try Foodland Ontario’s recipe for Maple Crème  Brûlée . And I’m so glad I did! You’d expect this delicious decadent treat to be a lot more difficult, but it’s actually quite easy.

This is definitely something that I will be making again soon, especially when we have a company. Give it a try, enjoy!

Maple Crème  Brûlée

(from Foodland Ontario)


2 cups whipping cream

½ cup Ontario maple syrup

2 Ontario eggs

2 Ontario egg yolks

1 tablespoon vanilla

¼ packed brown sugar


In a small saucepan, heat cream and maple syrup over medium heat until small bubbles begin to form around the edges. Remove from heat.

In a large measuring cup, whisk eggs, egg yolks and vanilla until well blended. Gradually whisk hot cream mixture into egg mixture until blended.

Divide among six ¾ cup ramekins or custard cups. Set ramekins in shallow pan and place pan in oven. Pour in enough hot water in pan to come halfway up sides of ramekins.

Bake in 350 degree F oven for 30 to 35 minutes or until edges are set but centres still jiggle when gently shaken. Carefully remove from water; let cool. Cover and refrigerate for about 3 hours, until chilled and set, or for up to 2 days.

Just before serving, place ramekins on rimmed baking sheet; blot top of custards with paper towel to dry. Sprinkle sugar evenly over custards. Broil as close to heat source as possible until sugar melts and bubbles, about 30 to 60 seconds. Let cool to harden. [Note: if your oven has not been preheated, it’ll take a bit longer. I needed about 2-3 minutes for my sugar crust to set. Keep a very close eye on the custards so they don’t burn]


The starring ingredients begin with whipping cream…

Delicious maple syrup, of course!

Delicious maple syrup, of course!

Eggs (which make it quite appropriate for the Easter season too)

Eggs (which make it quite appropriate for the Easter season too)

Ra-ra-ramekins going for a swim.

Ra-ra-ramekins going for a swim.

Now dig in!

Now dig in!


Lemon Meringue Cookies


IMG_0181

For the past week, I have been trying to carve out a bit of kitchen time to give Joy the Baker’s recipe for Lemon Meringue Cookies a whirl. Each time I tried, it seemed like the fates were lined up against me. Or to put it less dramatically, my four-month-old daughter is teething and has been fussier than usual.

It would be great to squeeze in some baking during her nap time, but that’s way too unpredictable. Sometimes she snoozes for a couple of hours, other times it’s just a 10 minute power nap.

With meringue and lemon curd, I needed to wait for an uninterrupted stretch. I’m glad I didn’t hold my breath, because this never came!

So last night I found myself holding a crying baby in one hand and a meringue covered spatula in the other. And I thought it was tough to make meringue before!

I had every intention of trying to pipe lovely little star shaped meringue drops, like Joy. I had to settle for hastily pumped out blobs.

My husband took on bedtime duty so I could make the lemon curd. By that time I was so tired I completely forgot to add two of the eggs to the mixture. This left me whisking a liquidy pot of curd for way longer than I should have.

I thought all was lost. It was too late to start over, and I didn’t have enough lemons anyway. So I refrigerated my watery curd and misshaped meringues and headed to bed.

Maybe it was luck. Maybe it was the congealing power of butter. But overnight, the curd set perfectly and developed a delicious tart lemon flavor. And in the daylight, my meringues didn’t look quite so funny-looking.

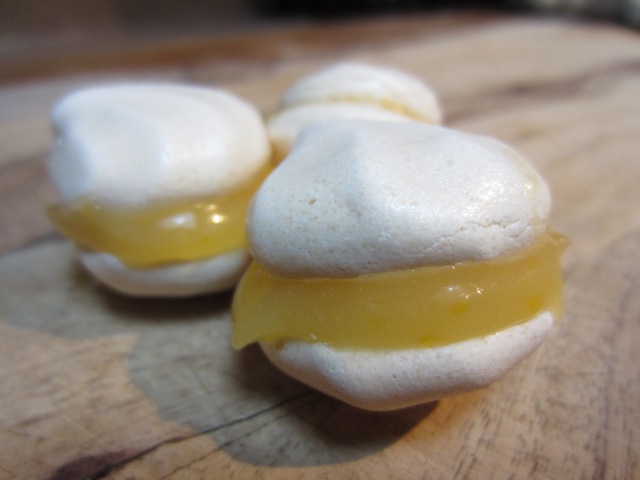
Against all odds, I actually pulled off Joy’s yummy Lemon Meringue Cookies. Score one for the multi-tasking mom!

The original recipe is kind of long, so I suggest you just read it first hand on Joy’s blog here. My only suggestion is to reduce the baking time of the meringues. In my oven, they were completely done after 1.5 hours. Keep an eye on them, and judge for yourself.

It’s also worth mentioning that these tasty cookies are naturally glutton free!

Enjoy!

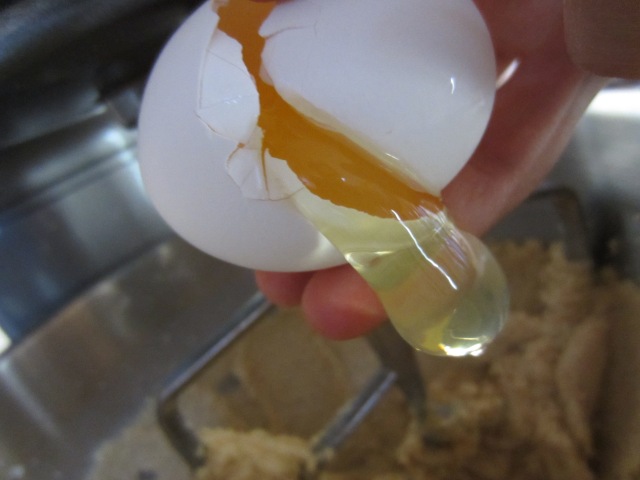
Beat the eggs, salt and sugar and until you get the elusive glossy, stiff peaks

Beat the eggs, salt and sugar and until you get the elusive glossy, stiff peaks

When life gives you lemons...make curd!

When life gives you lemons…make curd!

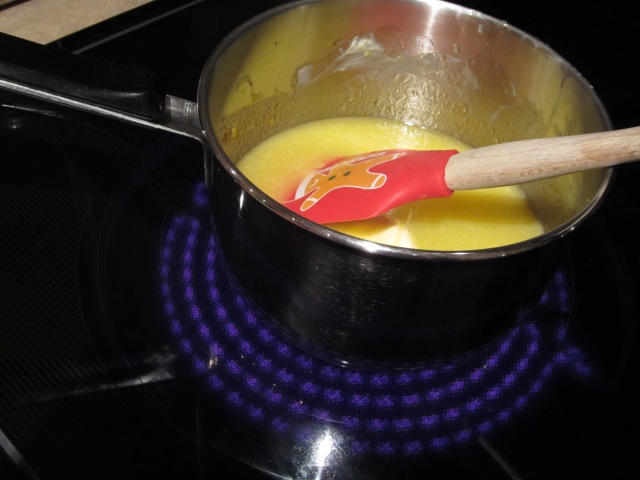
The curd comes together, despite the fact that I missed two key ingredients

The curd comes together, despite the fact that I missed two key ingredients. And yes, there is an out of season gingerbread man on my spatula.

The curd set perfectly overnight in the fridge.

The curd set perfectly overnight in the fridge.

Curd is the word!

Curd is the word!

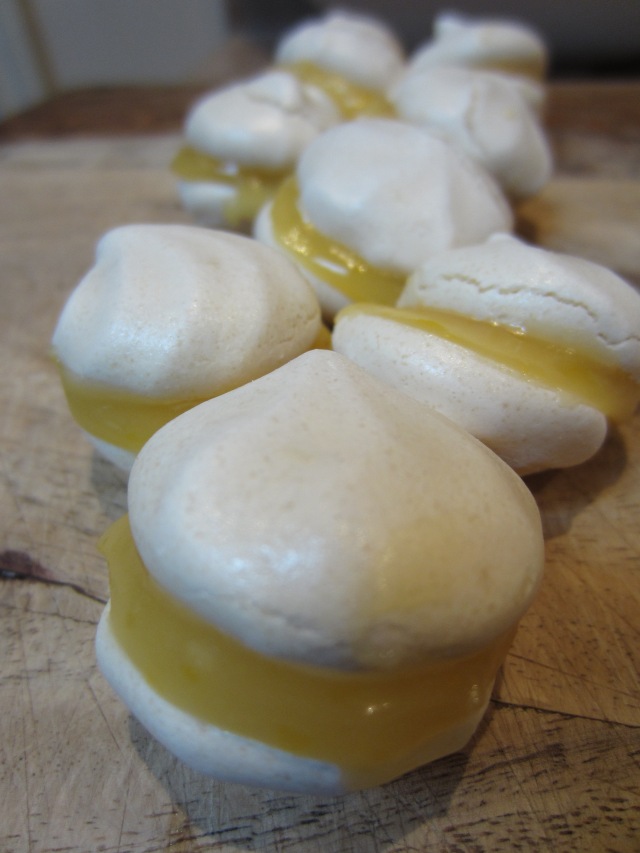
Yum!

Yum!


Peanut Butter Chocolate Swirl Cupcakes


IMG_0158

Confession: I have never had a particularly fine eye for aesthetic detail.

This dates all the way back to my kindergarten days when I was the only kid who couldn’t colour within the lines. My teacher tried sitting me beside the neatest girl in class. Unfortunately, none of it rubbed off on me.

I’d like to think that I have since improved my crayon skills. But I still don’t have much time for fussy or finicky details, especially in the kitchen. That’s why I have a love-hate relationship with cupcakes. I love the idea of moist, mini cakes. But I hate the process of frosting them.

I always overload the piping bag. This leads to icing overflow, which ends up on my hands, shirt, counter top and floor. By the time I actually get to icing the cupcake, I’m too tired/annoyed to make perfect sugary spirals that end in a cute little peak.

I know what you must be thinking. If I hate icing so much, why would I choose to bake a cupcake that called for not one, but two types of frostings?

Simple. The recipe came from Bakerella, who would never steer me wrong. And more importantly, the two icings happened to be chocolate and peanut butter – a sugary marriage made in heaven.

Bakerella did not disappoint. These were by far the best cupcakes I have ever made. The cake was chocolately and moist. Using oil rather than butter makes all the difference. And best of all, I didn’t even need to fire up my mixer for the batter! In my oven the cupcakes needed an extra 5 minutes of baking time – for a total of 20 minutes.

As I expected, the double icing in one piping bag was a bit of a mess. But I did it! The icings were both delicious, but the peanut butter was the star. Next time I’m only going to make the PB flavor.

Bakerella’s original recipe included mini peanut butter cookies as cupcake toppers. But with a little baby waiting in the wings, I called it a day with the cupcakes themselves!

Also, you may be wondering why the photography in this post looks so much more professional than usual. This week I was lucky enough to have my sister, who is a professional photographer, join me in the kitchen! So thanks Diana!

Give this recipe a whirl, enjoy!

Chocolate Peanut Butter Cupcakes
(Recipe from Bakerella)
For the Cupcakes:

1 1/2 cups all-purpose flour
2/3 cup cocoa
1 1/3 cups sugar
1 teaspoon baking soda
1/2 teaspoon baking powder
1/2 teaspoon salt
2 eggs
1/3 cup oil
1 teaspoon vanilla
2/3 cup milk
2/3 cup hot water

For the Icings:

1 cup butter, room temperature
2/3 cup creamy peanut butter
4 cups confectioners sugar
1/4 cup cocoa
2 Tablespoons milk

Preheat oven to 350 degrees.

Fill cupcake tray with cupcake liners.

In a large bowl, mix dry ingredients together with a wire whisk. Add eggs, oil, vanilla and milk and mix until combined. Add hot water and mix. It will be very liquid.

Fill cupcake liners about 2/3 full. Pour into liner with a large spouted measuring cup for ease.

Bake for 15 minutes or until done. Cool and make the cookies.

For chocolate frosting, beat 1/2 cup butter until creamy. Add 1 teaspoon vanilla and mix. Slowly add 2 cups confectioner’s sugar and cocoa and mix until combined. Add 1 Tablespoon milk and mix until creamy and smooth.

For peanut butter frosting, beat 1/2 cup butter and 2/3 cup peanut butter until creamy. Add 1 teaspoon vanilla and mix. Slowly add 2 cups confectioners sugar and mix until combined. Add 1 Tablespoon milk and mix until creamy and smooth.

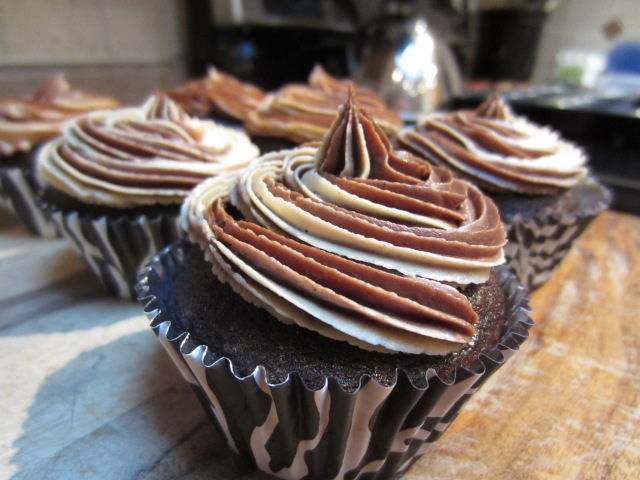
Fill a decorator bag fitted with a 1M tip with chocolate frosting on one half and peanut butter frosting on the other. Squeeze bag to force frosting into the tip and swirl frosting on cupcakes.

Oil is the magic ingredient to make your cupcakes super moist

Oil is the magic ingredient to make your cupcakes super moist

Adding the wet to the dry ingredients

Adding the wet to the dry ingredients

Beat it. Just beat it.

Beat it. Just beat it.

Pour the batter into the lined cupcake tray

Pour the batter into the lined cupcake tray

Straight from the oven. Fluffy and moist!

Straight from the oven. Fluffy and moist!


Next, start working on the frostings

Next, start working on the frostings

The beautiful finished product!

The beautiful finished product!

Yum!

Yum!

The Chocolate Chip Cookie


I find myself conflicted.

On one hand, I have resolved to restart this baking blog. That means carving out a little time each week to putter in the kitchen and write. It also means that tasty treats will be frequently hanging out on our countertop.

On the other hand, I have also pledged to lose my last 15 pounds of post-baby weight. That means a 7 a.m. daily DVD date with Jillian Michaels and weekly yoga classes. It should also mean avoiding everything buttery, sugary and delicious.

I hope you see my dilemma.

But as a wise old philosopher once said, everything in moderation. That means have one cookie (or two, just definitely not three). Have a small slice of cake.

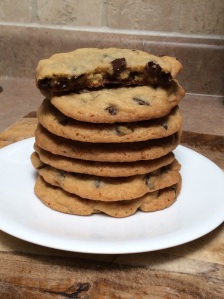
That seems reasonable to me. After all, I can’t imagine living in a calorie counted world that prohibits me from eating one of these…

20140326-150407.jpg

To me, one of life’s simple pleasures is biting into a freshly baked Martha Stewart chocolate chip cookie. Crunchy on the outside, chewy on the inside. And don’t forget about the melty chocolate chips. Yum!

I have tried many a chocolate chip cookie recipe, and this is by far my favourite. If I was stranded on a dessert island (pun intended) and was only allowed one recipe, it would be this one.

Martha has found the magical combination of white and light-brown sugars, and pinch of salt. Do not substitute or tweak the quantity of any ingredients. The reason these cookies taste so good is because they are chalk full of butter and sugar.

The recipe gives you options for cookie sizes. I like the 4 inchers, which bake for 15 minutes. They have good heft, density and texture.

Please give these a try – enjoy!

The Chocolate Chip Cookie

2 1/4 cups all-purpose flour
1 teaspoon baking soda
Salt
2 sticks unsalted butter, room temperature
1 1/2 cups packed light-brown sugar
3/4 cup granulated sugar
2 large eggs
2 teaspoons pure vanilla extract
12 ounces semisweet chocolate chips or chunks (2 cups)

Preheat oven to 350 degrees F.

Sift flour, baking soda, and 1 1/4 teaspoons salt into a bowl.

Beat butter and sugars with a mixer on medium-high speed until pale and fluffy, about 3 minutes.

On low speed, beat in eggs, 1 at a time.

Add flour mixture in 3 additions.

Beat in vanilla.

Mix in chocolate chips.

Scoop dough onto baking sheets, using the measurements listed below. Bake until edges are dark gold but centers are pale gold and look a bit underdone (for chewy) or until centers are set (for crisp), according to times listed below. Transfer sheets to wire racks. Let cool for 5 minutes. Transfer cookies to racks. Let cool completely.

For 3-inch cookies, use a 1 1/2-inch scoop (2 tablespoons). Bake for about 11 minutes for chewy or 14 to 16 minutes for crisp. (Makes 4 dozen)

For 2 1/4-inch cookies, use a 1 1/4-inch scoop (1 tablespoon). Bake for about 10 minutes for chewy or 14 to 16 minutes for crisp. (Makes 8 dozen)

For 1 1/2-inch cookies, use 1/2 teaspoon dough. Bake for about 10 minutes for chewy or 14 to 16 minutes for crisp. (Makes 12 dozen)

For 4-inch cookies, use a 2 1/4-inch ice cream scoop (1/4 cup). Bake for 14 to 15 minutes for chewy or 18 to 20 minutes for crisp. (Note: I bake mine for 15 minutes)

ingred

The raw goods

Mix

Break out the trusty mixer

chips

I dare you not to eat a cup of this cookie dough. Seriously

scooped

I scoop generously – 1/4 cup per cookie

sheet

Voila!

Flower Blossom Sugar Cookies


IMG_0142

When I was a kid, I could mark the changing seasons by the sugar cookies that my mom brought home from one of our favourite bakeries, The Hot Oven.

At Halloween we munched on cookies cut into the shape of jack-o-lanterns, decorated with orange sprinkles. At Christmas, we nibbled neatly cut stockings and bells, dusted in red and green sprinkles. And at Easter, we enjoyed bunnies topped with pink and yellow sprinkles.

Not only are sugar cookies delicious, they are also multi-purpose. They’re kind of like the little black dress of the cookie jar. Same recipe, and all you have to do is dress them up a little.

Since I have a soft spot for sugar cookies, I couldn’t help but notice a recipe posted on Pinterest by Two Twenty One. What really caught my eye was the fact that these sugar cookies did not require rolling, refrigeration or cookie cutters. Now that’s my kind of recipe!

And as though the baking stars were aligned, the April issue of Martha Stewart Living explained how to shape ordinary sugar cookies into pretty spring flowers.

So here’s my take on Two Twenty One’s yummy original recipe. You’ll note that I’ve substituted margarine for butter, added more vanilla, dropped in some food colouring, tweaked the baking time and opted out of the icing. Enjoy!

Flower Blossom Sugar Cookies

1 cup margarine
1 ½ cups granulated sugar
2 teaspoons pure vanilla
1 egg
2 ¾ cups of flour
1 teaspoon baking soda
½ teaspoon baking powder
small round candies of your choice, I used M&M easter eggs
food colouring of your choice (optional)
sprinkles (optional)

• Preheat oven to 350 degrees F.
• Combine flour, baking soda and baking powder. Set aside.
• In a separate bowl, cream margarine and sugar. Add egg and vanilla. Add in dry ingredients. The dough will be very crumbly.
• Add 4-5 drops of food colouring. [NOTE: maybe you’ll have better luck than me, but I found that the dough did not evenly absorb the food colouring. So my cookies turned out yellow speckled]
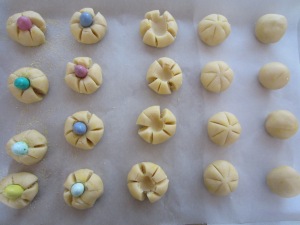
• Roll dough into 1 inch balls. Cut 6 evenly spaced slits into each ball, radiating from the centre. Each slit should be ½ of the way through the ball. [NOTE: Martha suggests slits ¾ of the way through the ball, but I found this too deep]
• Press your finger into the center of each ball to spread out the “petals.” Drop a candy into each indentation. Drop some sprinkles on the top of each “flower,” if desired.
• Bake for 15 minutes. The cookies will come out very soft, but the outside will crisp up nicely and the centres will be chewy.

IMG_0129

The ingredients take their starting positions

IMG_0130

The dry and wet ingredients take their corners

IMG_0132

After combining the dry and wet, the finished dough should look crumbly

IMG_0133

The dough progression

Godiva ain’t got nothing over my truffles


The simplest things can often be the best.
And I’m glad my husband reminded me of this concept as it came time to select a dessert recipe for Easter dinner this weekend.

To be honest, I have a knack for overcomplicating things for myself in the kitchen. This tendency comes from a lethal combination of enthusiasm, the desire to please and a bit of culinary naiveté.

Case in point: On New Year’s Eve, we hosted our first big dinner party. The most I’ve ever cooked for previously was a grand total of four. Was my first instinct to select a basic menu that I had made before? Nope. Instead, I triumphantly decided to try my hand at a prime rib for all of our 14 guests.

Thankfully, my hubby reigned me in on that idea. Instead, we opted for something a little more manageable: his famous sausage and veggie pasta, and my breaded eggplant. Everyone seemed satisfied. And as an added bonus, I avoided the massacre of an expensive slab of meat.

With this in mind, I picked one of my tried, tested and true recipes for Easter: Super Simple Oreo Cheesecake Truffles. Don’t let the word “truffle” deceive you. These rich, chocolately morsels could not be easier with only THREE ingredients.

Oreo cookies. Cream cheese. Melted chocolate wafer. That’s it. Oh, and did I mention it’s no bake?

The raw ingredients

All you have to do is toss a box of Oreos into the food processor, and combine the crumbs with a block of cream cheese. Roll into bit-sized balls. Refrigerate, then dip into melted chocolate.

The truffles end up looking like something you could have picked up at Godiva. And they are absolutely delicious! Who doesn’t like Oreo cheesecake?

I think my new kitchen mantra will be: keep it simple. I’ll let you know how that goes. More blog posts to come!

Super Simple Oreo Cheesecake Truffles

(I saw this recipe a couple of years ago on the Chocolate Fool blog, but it originated from the great Bakerella)

Ingredients:
• 1 package Oreo cookies
• 8oz. package cream cheese (softened)
• About 5 cups of white or dark chocolate melting wafers

Directions:
1. Break Oreo cookies in half and put them into your food processor. Pulse on high until they are ground into fine crumbs.
2. Place softened cream cheese in a mixing bowl. I cut the cream cheese brick into small chunks. Using a hand or stand mixer on medium speed, add in the Oreo crumbs until combined. Mixture doesn’t have to be smooth. Tiny flecks of cookie give the truffles texture.
3. Roll the mixture into 1 inch balls and place on a parchment lined baking sheet. Refrigerate for at least an hour.
4. Start melting the chocolate over a double boiler. (I boil water in a sauce pan. Once boiling, I place a metal mixing bowl on top with about two cups of wafers. Turn heat down and stir until chocolate is completely smooth)
5. Dip each ball in chocolate, tap off the excess and place onto parchment paper to cool. I’ve tried a variety of different utensils for dipping. I like chopsticks the best. A plastic fork with the middle tines cut out also works. You have to work quickly because the chocolate hardens, and the cheesecake balls get mushy. Work with smaller batches of melted chocolate, it’s easier.
6. Drizzle some contrasting chocolate on top of truffles, if desired.
7. Refrigerate overnight. Enjoy!


Into the food processor
Pre-chocolate dipped truffles. They look so naked…
Now that’s better!
Place them on to the baking sheet, then straight to the fridge!
Voila! A truffle is born!
Yum!

Dolce Amore, how sweet it is

 
A pretty delicious way to start off the New Year!

Dolce Amore. In Italian, this literally means: sweet love. It also happens to be the name of my favourite dessert. And if you’ve ever tasted it, you’ll understand how perfectly titled it is. 

The coffee flavoured confection is very similar to Tiramisu, except for one key difference. Tiramisu is made with mascarpone, a sweet cream cheese. Dolce Amore, however, calls for a whipped cream made with egg yolks, vanilla and sugar. This gives it a lighter density and texture. 

A little Kahlua is the the perfect mate to the espresso

Other than that, both desserts are made with the same basic ingredients: espresso, Savoiardi cookies, vanilla, and liqueur, such as Kahlua. Depending on personal preference, Tiramisu and Dolce Amore can either have the consistency of a cake or a trifle. This is determined by how long you soak the Savoiardi cookies, an Italian version of ladyfingers, in espresso and liqueur. We like our Dolce Amore moist and well-soaked.    

My mother makes the best Dolce Amore that I’ve ever tasted. In recent years, she’s introduced this dessert into our Christmas Day and New Year’s Eve menus. So this year, I played the role of dutiful assistant, sneaking a few photos along the way.   

We make our espresso the old fashioned way, using a little stove top machine. Meanwhile, our fancy Gaggia espresso maker sadly collects dust in the corner.

The basic recipe, made in a 7 to 9 inch spring form pan, serves about 10 people. The recipe can easily be doubled, if you’re using a larger glass or ceramic baking dish. For Christmas, we used a glass baking dish, which served about 15 to 20 people.   

My mother wanted me to convey a piece of advice to all Dolce Amore bakers. Although the presentation is more aesthetically pleasing when you line either the spring form pan or baking dish with unsoaked Savoiardi cookies, this does not enhance the tastiness of the dessert. The dry cookies look good, but are bland. We usually end up casting them aside on our plates, and eating the tasty innards of the cake instead. As you’ll see from the pictures, our New Year’s Eve Dolce Amore was cookie lined, while our Christmas version was not. When serving from a ceramic or glass dish, it’s easiest to cut the cake in square-shaped slices.   

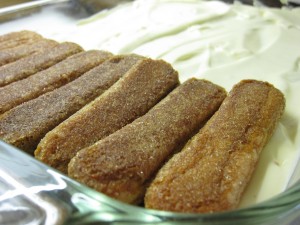
Savoiardi: the Italian ladyfinger

Another helpful hint from my mom, use the amount of espresso in the basic recipe as a starting point. If you find the cookies are too dry, add more espresso. Conversely, add less if you want a firmer, drier cake.   

Mom’s Dolce Amore (Make in 7 to 9 inch spring form pan. Serves about 10 people)   

  • Six espresso-sized cups of espresso (Literally use espresso cups to measure). Allow espresso to cool.
  • About 31 Savoiardi Cookies. (Available at Italian bakeries and most grocery stores) If you choose to line the perimeter with dry cookies, you’ll need about 22 more.
  • One pint whipping cream
  • ¼ teaspoon pure vanilla extract
  • 5 egg yolks
  • 5 tablespoons granulated sugar
  • 4 tablespoons of coffee-flavoured liqueur, such as Kahlua. (This is optional. Add more or less to taste)
  • Coco powder, for garnish

Directions

  1. Make espresso, and allow it to cool completely.
  2. Whip sugar, vanilla and egg yolks in an electric mixer until creamy.
  3. In a shallow bowl, combine cooled espresso and liqueur.
  4. Optional step: Line the perimeter of your spring form pan with dry Savoiardi cookies, standing vertically. This will form a visually pleasing supporting wall for the cake.
  5. To make the first layer of the cake: dip each Savoiardi cookie in the espresso mixture, and then line the bottom of the spring form pan with the wet cookies. Once the bottom is covered, spread half of the whipped cream mixture over top of the wet cookies.
  6. To make the second layer of the cake: dip each remaining cookie the espresso mixture, placing them over top of the whipped cream mixture. Spread the rest of the whipped cream mixture over top of the wet cookies. Use a spatula to smooth the top layer of the whipped cream mixture. Cover with plastic wrap. Refrigerate overnight. Dust with coco powder before serving.

First you dip....


...then you line...


...then enjoy!

My meringues, Nonna’s magic


On Christmas Eve, Santa Claus holds nothing over my Nonna. While he is wiggling his way down chimneys across the globe, she is making a little magic of her own – in the kitchen.

Crispy golden fritters, stuffed with sharp cheese and anchovies, lay waiting for us on the countertop. A true holiday comfort food, the warmth and simple flavours of this dish envelope your mouth and rekindle memories of Christmases past.

Next comes the baccala, or cod, which is cooked with a traditional medley of figs, raisins, walnuts and potatoes. The sweetness of the fruit is a perfect pairing to the saltiness of the cod. The walnuts bring the dish a rich flavour and unexpected texture.

And the pièce de résistance is my Nonna’s pasta di mare, a delicacy which only comes once a year. Her classic tomato sauce is enriched by the flavours of fresh shrimp, scallops, squid and crab. As she plates the dish, my Nonna generously ladles out the sugu, or sauce, until the spaghetti is fully bathed in red.

As is the case with most of my Nonna’s cooking, there are no written recipes for these Christmas dishes. She calculates according to taste and touch. This makes it incredibly challenging for us to try and nail down a recipe on paper. My mother was on a mission this year, and is fairly confident she captured all the essential ingredients. But I know, there will always be that extra something that only my Nonna can bring to the dish.

Light and delicious: coconut meringues!

While dinner on Christmas Eve and Day are my Nonna and mother’s domain (my mom does a juicy bacon draped turkey), I am on dessert duty. And this year, I decided to try coconut meringues. This came about for two main reasons: we had leftover egg whites, and the recipe was ultra simple. Added bonus: this is one cookie that doesn’t pack a high-calorie punch.

For the recipe, I turned to our trusty 1973 edition of The Joy of Cooking. There’s an innate credibility that seems to emanate from the yellowing, sauce-stained pages of TJC.   

A cookbook classic

The recipe couldn’t be easier. Five ingredients: sugar, egg whites, salt, vanilla and shredded coconut. I am happy to report that I successfully beat the egg whites into stiff glossy peaks. However, I decided not to sift the granulated sugar, as called for by the recipe. I didn’t think it would make a difference, and opted not to dirty another utensil.  Once the stiff peaks were achieved, I folded in vanilla and the shredded coconut.  That’s it.

The cookies tasted like macaroons, except they were crispy on the outside and chewy on the inside. Next time, I might reduce the amount of sugar to ¾ of a cup, to make the cookies slightly less sweet. In one of the batches I added a teaspoon of coco powder, which gave a nice hint of chocolate flavour.

The ever elusive (at least for me) stiff, glossy peaks!

The only aspect of this recipe that I wasn’t thrilled with was the presentation. The meringues I made ended up flattening out like regular cookies. Perhaps I should have formed a Hersey Kiss shape by using an icing piper. I’ll give it a try next time.


 Also, be sure you let the meringues cool completely before removing them from the baking sheet. Otherwise, half the cookie gets stuck to the parchment paper, giving the meringue a slightly disembowelled look. Otherwise, this recipe is definitely a keeper. And I would go so far as to call it my most successful cookie to date!


Coconut Meringue Cookies (from The Joy of Cooking)

– 1 cup granulated sugar

– 3 egg whites

– 1/8 teaspoon salt

– 1 teaspoon vanilla

– 1 ¼ cup shredded coconut (I used unsweetened)

– 1 teaspoon coco powder (optional)

Directions

  1. Preheat oven to 300 degrees.
  2. With an electric mixer on high, beat egg whites and salt until stiff, glossy peaks form.
  3. Add the sugar very slowly, beating constantly on high. If desired, add coco powder.
  4. By hand, fold in vanilla and shredded coconut.
  5. Drop the batter from a teaspoon onto a greased and well-floured tin. Bake for about 25-30 minutes. Cookies should be firm to the touch, and slightly golden (not brown) in colour.


Crisp outside, chewy inside, with a hint of coco!