When I was a kid, I could mark the changing seasons by the sugar cookies that my mom brought home from one of our favourite bakeries, The Hot Oven.
At Halloween we munched on cookies cut into the shape of jack-o-lanterns, decorated with orange sprinkles. At Christmas, we nibbled neatly cut stockings and bells, dusted in red and green sprinkles. And at Easter, we enjoyed bunnies topped with pink and yellow sprinkles.
Not only are sugar cookies delicious, they are also multi-purpose. They’re kind of like the little black dress of the cookie jar. Same recipe, and all you have to do is dress them up a little.
Since I have a soft spot for sugar cookies, I couldn’t help but notice a recipe posted on Pinterest by Two Twenty One. What really caught my eye was the fact that these sugar cookies did not require rolling, refrigeration or cookie cutters. Now that’s my kind of recipe!
And as though the baking stars were aligned, the April issue of Martha Stewart Living explained how to shape ordinary sugar cookies into pretty spring flowers.
So here’s my take on Two Twenty One’s yummy original recipe. You’ll note that I’ve substituted margarine for butter, added more vanilla, dropped in some food colouring, tweaked the baking time and opted out of the icing. Enjoy!
Flower Blossom Sugar Cookies
1 cup margarine
1 ½ cups granulated sugar
2 teaspoons pure vanilla
1 egg
2 ¾ cups of flour
1 teaspoon baking soda
½ teaspoon baking powder
small round candies of your choice, I used M&M easter eggs
food colouring of your choice (optional)
sprinkles (optional)
• Preheat oven to 350 degrees F.
• Combine flour, baking soda and baking powder. Set aside.
• In a separate bowl, cream margarine and sugar. Add egg and vanilla. Add in dry ingredients. The dough will be very crumbly.
• Add 4-5 drops of food colouring. [NOTE: maybe you’ll have better luck than me, but I found that the dough did not evenly absorb the food colouring. So my cookies turned out yellow speckled]
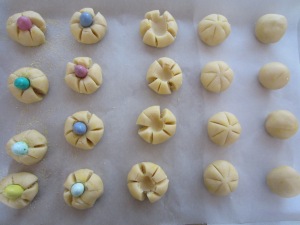
• Roll dough into 1 inch balls. Cut 6 evenly spaced slits into each ball, radiating from the centre. Each slit should be ½ of the way through the ball. [NOTE: Martha suggests slits ¾ of the way through the ball, but I found this too deep]
• Press your finger into the center of each ball to spread out the “petals.” Drop a candy into each indentation. Drop some sprinkles on the top of each “flower,” if desired.
• Bake for 15 minutes. The cookies will come out very soft, but the outside will crisp up nicely and the centres will be chewy.


